树莓派搭建简略WiFi无线路由器

目前我家有装有倆路由器,所以在搞一个觉得有点……
然而本文介绍用树莓派来搭建一个简略的WiFi无线路由器,来体验树莓派的强大功能。

PS: 更新时间: 2019-08-13 21:13

安装环境

用一根网线连接路由器和树莓派,用于提供网络
无线网卡,这里我用很久以前买的那个360随身WiFi(悲催)
主机:Archlinux,树莓派
工具:hostapd,dnsmasq,iptables

树莓派配置信息

插入网线网卡用网线连接好树莓派后开机,并在本机上ssh远程连接树莓派。
以下是树莓派的一些配置信息,其中wlan1就是外置无线接口。

// 我本来是想将无线接口wlan1的IP配置成静态地址,而wlan0接入因特网。但现在我用网线连接到树莓派所以干脆把树莓派作为第二个路由器。

1
2
3
4
5
6
7
8
9
10
11
12
13
14
15
16
17
18
19
20
21
22
23
24
25
26
27
28
29
30
31
32
33
34
35
36
37
38
39
40
41
42
43
44
45
46
47
48
49
50
pi@raspberrypi:~ $ uname -a
Linux raspberrypi 4.9.80-v7+ #1098 SMP Fri Mar 9 19:11:42 GMT 2018 armv7l GNU/Linux
pi@raspberrypi:~ $ ifconfig
eth0: flags=4163<UP,BROADCAST,RUNNING,MULTICAST> mtu 1500
inet 192.168.2.110 netmask 255.255.255.0 broadcast 192.168.2.255
inet6 fe80::ba27:ebff:fe51:c2cd prefixlen 64 scopeid 0x20<link>
ether b8:27:eb:51:c2:cd txqueuelen 1000 (Ethernet)
RX packets 286 bytes 19770 (19.3 KiB)
RX errors 0 dropped 0 overruns 0 frame 0
TX packets 257 bytes 33091 (32.3 KiB)
TX errors 0 dropped 0 overruns 0 carrier 0 collisions 0

lo: flags=73<UP,LOOPBACK,RUNNING> mtu 65536
inet 127.0.0.1 netmask 255.0.0.0
inet6 ::1 prefixlen 128 scopeid 0x10<host>
loop txqueuelen 1 (Local Loopback)
RX packets 6 bytes 522 (522.0 B)
RX errors 0 dropped 0 overruns 0 frame 0
TX packets 6 bytes 522 (522.0 B)
TX errors 0 dropped 0 overruns 0 carrier 0 collisions 0

wlan0: flags=4099<UP,BROADCAST,MULTICAST> mtu 1500
inet 192.168.3.1 netmask 255.255.255.0 broadcast 192.168.3.255
ether b8:27:eb:04:97:98 txqueuelen 1000 (Ethernet)
RX packets 0 bytes 0 (0.0 B)
RX errors 0 dropped 0 overruns 0 frame 0
TX packets 0 bytes 0 (0.0 B)
TX errors 0 dropped 0 overruns 0 carrier 0 collisions 0

pi@raspberrypi:~ $ iwconfig
wlan1 IEEE 802.11 ESSID:off/any
Mode:Managed Access Point: Not-Associated Tx-Power=0 dBm
Retry short limit:7 RTS thr:off Fragment thr:off
Power Management:on

lo no wireless extensions.

wlan0 IEEE 802.11 ESSID:off/any
Mode:Managed Access Point: Not-Associated Tx-Power=31 dBm
Retry short limit:7 RTS thr:off Fragment thr:off
Power Management:on

eth0 no wireless extensions.

pi@raspberrypi:~ $ lsusb
Bus 001 Device 005: ID 0c45:800a Microdia Vivitar Vivicam3350B
Bus 001 Device 004: ID 148f:760b Ralink Technology, Corp. MT7601U Wireless Adapter
Bus 001 Device 003: ID 0424:ec00 Standard Microsystems Corp. SMSC9512/9514 Fast Ethernet Adapter
Bus 001 Device 002: ID 0424:9514 Standard Microsystems Corp. SMC9514 Hub
Bus 001 Device 001: ID 1d6b:0002 Linux Foundation 2.0 root hub

配置无线网卡

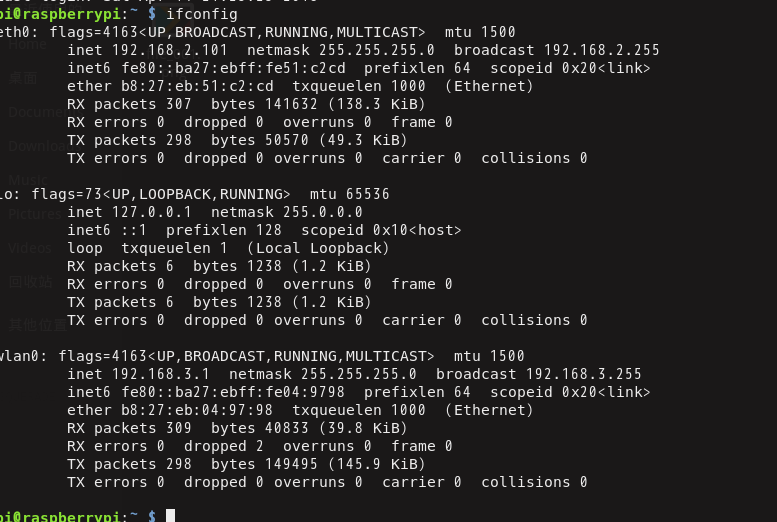
这一步骤是修改树莓派的IP地址为路由器地址

1
2
3
4
5
6
7
8
9
10
11
12
13
14
15
$ nano /etc/network/interfaces
auto lo
iface lo inet loopback

auto eth0
iface eth0 inet static
address 192.168.2.110
netmask 255.255.255.0
gateway 192.168.2.1

#这里的IP地址其实相当于 "路由器" ip地址
allow-hotplug wlan0
iface wlan0 inet static
address 192.168.3.1
netmask 255.255.255.0

配置hostapd

hostapd能够“模拟”出一个AP,作为一个认证服务器,并对连接的设备控制管理。
简单说hostapd能够让我们设置WiFi的名称,密码和加密方式等等

hostapd is a user space daemon for access point and authentication servers. It implements IEEE 802.11 access point management, IEEE 802.1X/WPA/WPA2/EAP Authenticators, RADIUS client, EAP server, and RADIUS authentication server. The current version supports Linux (Host AP, madwifi, mac80211-based drivers) and FreeBSD (net80211).

安装 hostapd

1
sudo apt-get install hostapd

新建文件 /etc/hostapd/hostapd.conf ,并添加如下内容

1
2
3
4
5
6
7
8
9
10
11
12
13
14
15
16
17
18
19
20
#无线网卡接口
interface=wlan0
#驱动程序
driver=nl80211
hw_mode=g
ssid=WIFI-001
#通道
channel=6
#加密模式 WPA2
wpa=2
wpa_passphrase=12345678
wpa_key_mgmt=WPA-PSK
wpa_pairwise=CCMP
rsn_pairwise=CCMP
auth_algs=3
wmm_enabled=1
# 连接ap的最大数量
max_num_sta=10
logger_stdout=-1
logger_stdout_level=2

其中 ssidwpa_passphrase 分别为WiFi热点的名称和密码。

接着,还需修改 /etc/default/hostapd

1
2
3
4
5
6
7
8
9
10
11
12
13
14
15
16
17
18
19
# Defaults for hostapd initscript
#
# See /usr/share/doc/hostapd/README.Debian for information about alternative
# methods of managing hostapd.
#
# Uncomment and set DAEMON_CONF to the absolute path of a hostapd configuration
# file and hostapd will be started during system boot. An example configuration
# file can be found at /usr/share/doc/hostapd/examples/hostapd.conf.gz
#
DAEMON_CONF="/etc/hostapd/hostapd.conf"
# Additional daemon options to be appended to hostapd command:-
# -d show more debug messages (-dd for even more)
# -K include key data in debug messages
# -t include timestamps in some debug messages
#
# Note that -B (daemon mode) and -P (pidfile) options are automatically
# configured by the init.d script and must not be added to DAEMON_OPTS.
#
#DAEMON_OPTS=""

取消 DAEMON_CONF="/etc/hostapd/hostapd.conf" 注释,并添加 hostapd.conf 的路径。这是hostapd守护进程默认要加载的配置文件,这样树莓派每次重启都会加载这个配置文件

测试

当然,我们可以在此之前临时测试配置文件是否生效

1
2
3
4
5
6
7
$ sudo hostapd /etc/hostapd/hostapd.conf
Configuration file: /etc/hostapd/hostapd.conf
Failed to create interface mon.wlan0: -95 (Operation not supported)
wlan0: Could not connect to kernel driver
Using interface wlan0 with hwaddr b8:27:eb:04:97:98 and ssid "Wifi"
wlan0: interface state UNINITIALIZED->ENABLED
wlan0: AP-ENABLED

看到

wlan0: interface state UNINITIALIZED->ENABLED
wlan0: AP-ENABLED

就表示成功创建了一个AP,但无法连接到网络。

配置 dnsmasq

Dnsmasq 提供 DNS 缓存和 DHCP 服务功能。作为域名解析服务器(DNS),dnsmasq可以通过缓存 DNS 请求来提高对访问过的网址的连接速度。作为DHCP 服务器,dnsmasq 可以用于为局域网电脑分配内网ip地址和提供路由。DNS和DHCP两个功能可以同时或分别单独实现。dnsmasq轻量且易配置,适用于个人用户或少于50台主机的网络。

也就是说,利用dnsmasq的DNS缓存功能能够让连接AP的设备请求缓存下来,这样下次再连接就无法再需要输入密码,当然这只是暂时的。而通过DHCP就可以动态的为已经连接的设备分配网ip地址等信息。

安装 dnsmasq

1
$ sudo apt-get install dnsmasq

编辑 /etc/dnsmasq.conf,其中大部分都是注释。
在最后添加如下内容

1
2
3
4
5
interface=wlan0
listen-address=127.0.0.1,192.168.3.1
dhcp-range=192.168.3.50,192.168.3.150,12h
# DNS
resolv-file=/etc/resolv.conf

dhcp-range 表示要动态分配给连接设备IP地址在所属IP网段范围之内,这里为50~150

/etc/resolv.conf 配置如下

1
nameserver 8.8.8.8

开启IP转发功能

注意,这一步是必须的,不然就算设备连接成功WiFi,那也无法连接到网络!!!

1
2
3
4
5
1. sudo sh -c "echo 1 > /proc/sys/net/ipv4/ip_forward"
2. sudo sysctl net.ipv4.ip_forward=1
sudo sysctl -p /etc/sysctl.conf

cat /proc/sys/net/ipv4/ip_forward

建议修改 /etc/sysctl.conf 文件,只需将 #net.ipv4.ip_forward=1 取消注释即可。

iptables防火墙路由转发

这一步同上一步一样重要,这里主要是设置nat路由转发,不然还是无法上网的

1
2
3
4
5
6
7
8
9
10
11
pi@raspberrypi:~ $ sudo iptables -t nat -A POSTROUTING -o eth0 -j MASQUERADE
pi@raspberrypi:~ $ sudo iptables -t nat --line-numbers -L -n
Chain PREROUTING (policy ACCEPT)
num target prot opt source destination
Chain INPUT (policy ACCEPT)
num target prot opt source destination
Chain OUTPUT (policy ACCEPT)
num target prot opt source destination
Chain POSTROUTING (policy ACCEPT)
num target prot opt source destination
1 MASQUERADE all -- 0.0.0.0/0 0.0.0.0/0

这里的意思是,路由器源地址(MASQUERADE自动获取当前树莓派IP地址[ 比如我这里为静态192.168.2.110 ]),并且已接入网络)将数据通过eth0接口转发到已连接的IP地址(0.0.0.0/0)

在这里 -j MASQUERADE 相当于 -j SNAT --to-source 192.168.2.110
这个时候设备既可以连接到互联网了!

开启启动服务

1.开机自启动服务

1
2
sudo systemctl enable hostapd
sudo systemctl enable dnsmasq

2.自动设置iptables

1
sudo iptables-save > /home/pi/iptables_forward

添加如下内容到 /etc/rc.local (exit 0 之前)

1
iptables-restore < /home/pi/iptables_forward

注意还要开启了IP转发功能

之后 sudo reboot 重启,等待

结尾

如果在 sudo systemctl enable hostapd 时出现一下信息

Synchronizing state of hostapd.service with SysV service script with /lib/systemd/systemd-sysv-install.
Executing: /lib/systemd/systemd-sysv-install enable hostapd
Failed to enable unit: Unit file /etc/systemd/system/hostapd.service is masked.

解决方法 sudo systemctl unmask hostapd 后再 sudo systemctl enable hostapd

最后的最后补成果图
img

img

img

bye~


本博客所有文章除特别声明外,均采用 CC BY-SA 4.0 协议 ,转载请注明出处!