CentOS+TinyProxy+Stunnel配置HTTP代理服务器

本文将利用CentOS、TinyProxy、Stunnel搭建一个正向代理服务器…

之前的 CentOS服务器Shadowsocks 是在CentOS7上配置Shadowsocks将其作为代理服务器,而这次的tinyproxy配置同样也是把CentOS7作为一个代理服务器,而且SS是基于Socks5协议,tinyproxy是HTTP/HTTPS协议。

TinyProxy

TinyProxy是一个由C语言开发、开源、轻量级的HTTP/HTTPS代理服务器 Github

Tinyproxy is a light-weight HTTP/HTTPS proxy daemon for POSIX operating systems. Designed from the ground up to be fast and yet small, it is an ideal solution for use cases such as embedded deployments where a full featured HTTP proxy is required, but the system resources for a larger proxy are unavailable.

tinyproxy比squid配置要简单,但squid功能却比tinyproxy要多且灵活性高。不过我对squid不是很深入了解,暂时就拿tinyproxy来说吧。
由于我的服务器是CentOS7,故可直接从包管理器安装

1
[root@VM_0_17_centos ~]# yum install -y tinyproxy

若包管理器中没有tinyproxy,那么

1
2
3
yum install -y epel-release
yum update -y
yum -y install tinyproxy

之后就是配置tinyproxy了

1
[root@VM_0_17_centos ~]# vim /etc/tinyproxy/tinyproxy.conf

修改tinyproxy监听端口Port,默认 8888
注释Allow参数,表示允许所有人都可以访问代理服务器。如果只希望指定的IP能够访问代理服务器,那么可以添加多个Allow

1
2
3
4
Port 8888
#Allow 127.0.0.1
Allow 10.10.6.0/24
Allow 123.200.123.66

注意 #DisableViaHeader Yes 这个参数,用于指定是否在请求Header中显示tinyproxy相关信息(比如:Proxy-agent: tinyproxy/1.8.3),默认是关闭的。

1
2
3
4
5
6
7
8
9
10
11
12
13
14
15
16
#
# ViaProxyName: The "Via" header is required by the HTTP RFC, but using
# the real host name is a security concern. If the following directive
# is enabled, the string supplied will be used as the host name in the
# Via header; otherwise, the server's host name will be used.
#
#ViaProxyName "tinyproxy"

#
# DisableViaHeader: When this is set to yes, Tinyproxy does NOT add
# the Via header to the requests. This virtually puts Tinyproxy into
# stealth mode. Note that RFC 2616 requires proxies to set the Via
# header, so by enabling this option, you break compliance.
# Don't disable the Via header unless you know what you are doing...
#
#DisableViaHeader Yes

其他参数默认即可,之后就是启动tinyproxy

1
2
[root@VM_0_17_centos ~]# systemctl start tinyproxy.service
[root@VM_0_17_centos ~]# systemctl enable tinyproxy.service

配置iptables

1
2
3
4
# 允许访问
iptables -I INPUT -p tcp --dport 8888 -j ACCEPT
# 拒绝访问
iptables -I INPUT -p tcp --dport 8888 -j REJECT

可能还需要配置云服务器安全组外界才能访问tinyproxy端口

之后就能够直接通过该代理服务器进行代理访问了
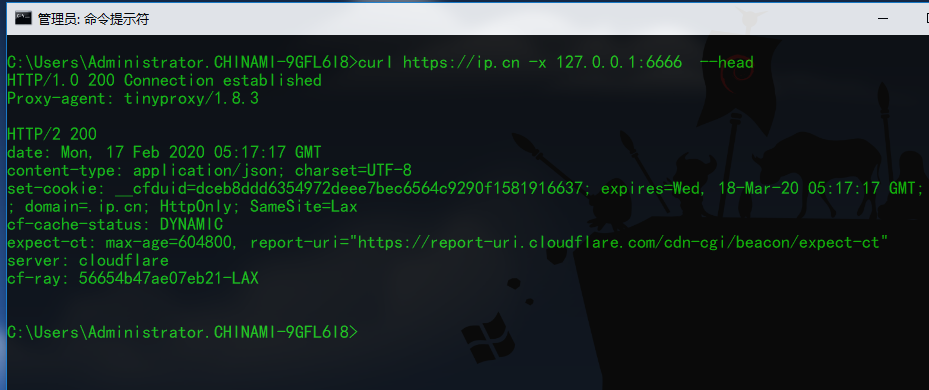
1
2
3
4
5
6
7
8
9
10
11
12
% curl -x 129.204.152.8:8888 https://ip.cn --head
HTTP/1.0 200 Connection established
Proxy-agent: tinyproxy/1.8.3

HTTP/2 200
date: Mon, 17 Feb 2020 02:08:20 GMT
content-type: application/json; charset=UTF-8
set-cookie: __cfduid=d404e02d9f8749f3815ce40da97e29bbf1581905300; expires=Wed, 18-Mar-20 02:08:20 GMT; path=/; domain=.ip.cn; HttpOnly; SameSite=Lax
cf-cache-status: DYNAMIC
expect-ct: max-age=604800, report-uri="https://report-uri.cloudflare.com/cdn-cgi/beacon/expect-ct"
server: cloudflare
cf-ray: 5664367e282eeba9-LAX

当然也可以 curl -x 129.204.152.8:8888 https://ip.cn --head -k,即允许curl使用非安全的ssl连接并且传输数据(证书不受信)。
注意 Proxy-agent: tinyproxy/1.8.3 ,之前我们并没有注释 #DisableViaHeader Yes,它会在Via请求中显示代理信息。
查看日志log tail /var/log/tinyproxy/tinyproxy.log

然而事情并没有结束…

Stunnel(隧道)

Stunnel是一个自由的跨平台软件,用于提供全局的TLS/SSL服务。针对本身无法进行TLS或SSL通信的客户端及服务器,Stunnel可提供安全的加密连接。

如果用代理服务器访问一个HTTP协议的网站,那么传输的数据是不会加密的,也就是说可以被抓包软件获取数据包,比如Wireshark。我在服务器配置了Apache,开启80端口,比如这样一个HTTP ULR: http://129.204.152.8:80
curl -x 129.204.152.8:8888 http://129.204.152.8 -v

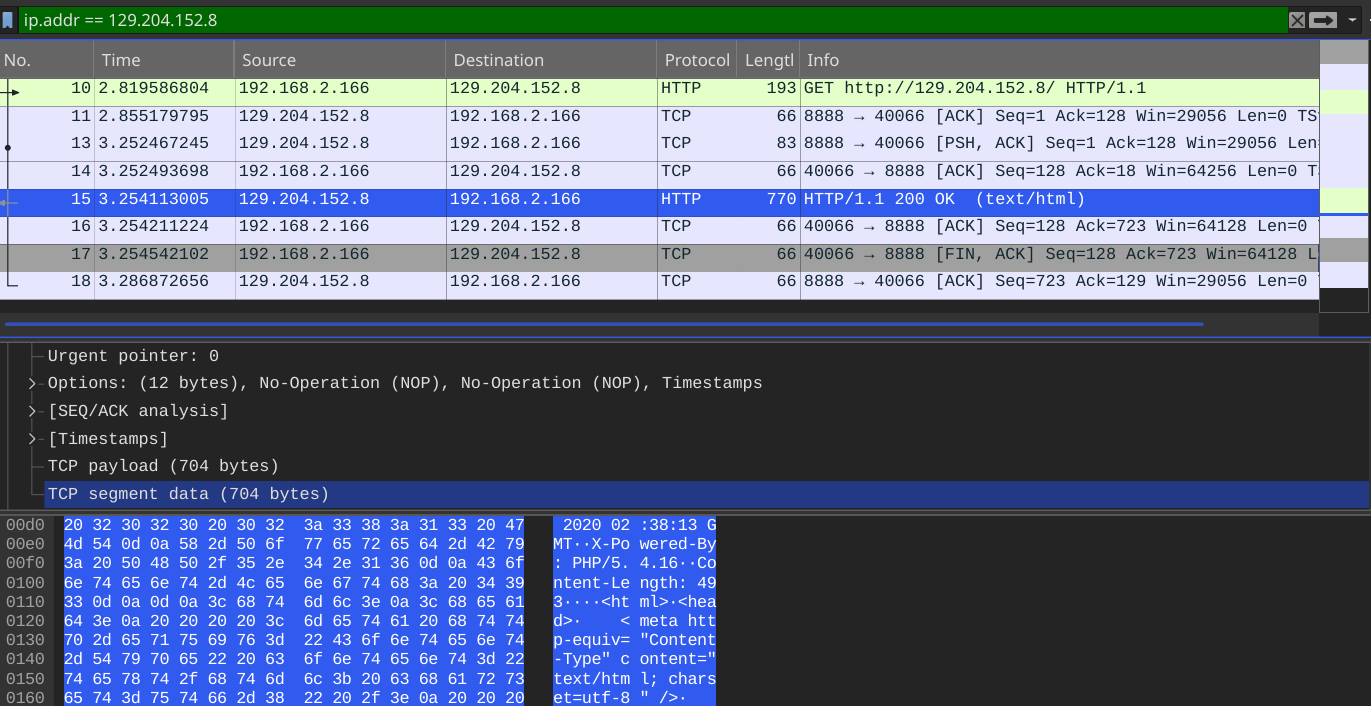
可见数据没有加密,而是直接在两台主机间传输,我们希望HTTP传输也是安全的,也就是经过加密的,那么可以使用Stunnel和TinyProxy来混淆HTTP流量。

CentOS安装Stunnel yum install -y stunnel

配置服务端Server

vim /etc/stunnel/stunnel.conf,如果stunnel.conf不存在,那么新建一个并添加以下内容

1
2
3
4
5
[tinyproxy]
accept = 0.0.0.0:3128
connect = 0.0.0.0:8888
cert = /etc/ssl/cert.pem
key = /etc/ssl/key.pem
  • accept 服务器stunnel监听端口,用于与客户端进行连接
  • connect 用于告诉stunnel要连接的IP和端口。这需要是TinyProxy监听的IP和端口,netstat -anpl|grep tinyproxy可看到
  • cert 本地证书文件路径,可以用openssl生成
  • key 本地密匙文件路径
创建自签名证书

要启动stunnel,那还需要创建自签名证书。

生成key.pem

1
2
3
4
5
[root@VM_0_17_centos ~]# openssl genrsa -out /etc/ssl/key.pem 4096
Generating RSA private key, 4096 bit long modulus
......................................................................++
..............................................................++
e is 65537 (0x10001)

这将创建一个4096位RSA密钥key.pem。有兴趣的可以了解下"RSA Key Sizes: 2048 or 4096 bits?"

生成cert.pem

1
2
3
4
5
6
7
8
9
10
11
12
13
14
15
16
17
18
19
20
[root@VM_0_17_centos ~]# openssl req -new -x509 -key /etc/ssl/key.pem -out /etc/ssl/cert.pem -days 1826
You are about to be asked to enter information that will be incorporated
into your certificate request.
What you are about to enter is what is called a Distinguished Name or a DN.
There are quite a few fields but you can leave some blank
For some fields there will be a default value,
If you enter '.', the field will be left blank.
-----
Country Name (2 letter code) [XX]:US
State or Province Name (full name) []:Arizona
Locality Name (eg, city) [Default City]:Phoenix
Organization Name (eg, company) [Default Company Ltd]:
Organizational Unit Name (eg, section) []:
Common Name (eg, your name or your server's hostname) []:VM_0_17_centos
Email Address []:[email protected]
[root@VM_0_17_centos ~]# ls -lh /etc/ssl/
total 8.0K
-rw-r--r-- 1 root root 2.1K Feb 17 11:03 cert.pem
lrwxrwxrwx 1 root root 16 Feb 6 11:56 certs -> ../pki/tls/certs
-rw-r--r-- 1 root root 3.2K Feb 17 10:55 key.pem
  • new x509 创建一个新的X509证书
  • days 证书的有效期
  • key 密匙文件
  • out 输出到cert.pem

生成的同时还要回答一些问题

  • Country Name 国家 (PL,UK,US,CA)
  • State or Province Name 州或省 (Illinois,Ontario,…)
  • Locality Name 地区 (Chicago,Toronto,…)
  • Organization Name 组织
  • Organizational Unit Name 组织单位
  • Common Name (your name or your server’s hostname) 一般服务器hostname
  • Email Address 电子邮件

启动stunnel stunnel /etc/stunnel/stunnel.conf

1
2
[root@VM_0_17_centos ~]# netstat -antpl|grep stunnel
tcp 0 0 0.0.0.0:3128 0.0.0.0:* LISTEN 24263/stunnel

配置客户端Client

配置完服务器还需要配置本地客户端,就拿Arch/Manjaro举例。
安装stunnel pacman -S stunnel

cp /etc/stunnel/stunnel.conf-sample /etc/stunnel/stunnel.conf
vim /etc/stunnel/stunnel.conf
编辑配置文件stunnel.conf可以全部删除只添加以下内容

1
2
3
4
5
6
[tinyproxy]
client = yes
accept = 0.0.0.0:3129
connect = 129.204.152.8:3128
verify = 3
CAfile = /etc/stunnel/cert.pem
  • client 表明这是客户端
  • accept 本地stunnel监听ip地址+端口 0.0.0.0:xxxx
  • connect 要连接到远程stunnel服务器
  • verify 证书验证级别,verify=3根据本地安装的证书并验证证书
  • CAfile 服务器上生成的cert.pem,将其复制到本地/etc/stunnel/cert.pem

之后就可以启动stunnel了,stunnel /etc/stunnel/stunnel.conf,也可以 systemctl start stunnel.servicesystemctl enable stunnel.service

测试
1
2
3
4
5
6
7
8
9
10
11
12
% curl -x 127.0.0.1:3129 https://ip.cn --head
HTTP/1.0 200 Connection established
Proxy-agent: tinyproxy/1.8.3

HTTP/2 200
date: Mon, 17 Feb 2020 03:58:29 GMT
content-type: application/json; charset=UTF-8
set-cookie: __cfduid=d340c54d6fa045689f6f49e91ac7f918f1581911909; expires=Wed, 18-Mar-20 03:58:29 GMT; path=/; domain=.ip.cn; HttpOnly; SameSite=Lax
cf-cache-status: DYNAMIC
expect-ct: max-age=604800, report-uri="https://report-uri.cloudflare.com/cdn-cgi/beacon/expect-ct"
server: cloudflare
cf-ray: 5664d7d91e5d77b8-LAX

curl -x 127.0.0.1:3129 http://129.204.152.8 -v

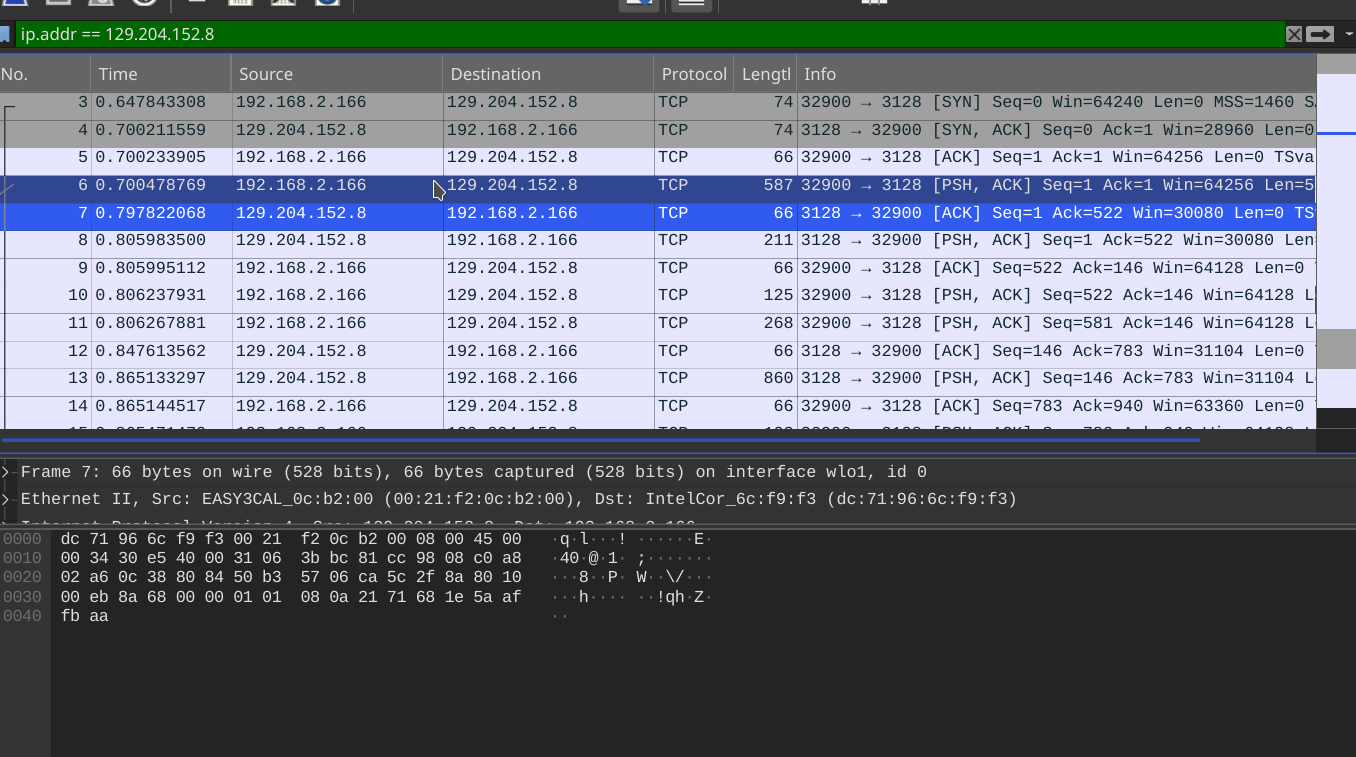
可见成功的搭建了一个基于TLS的HTTP/HTTPS代理。

Windows Stunnel

对于Windows系统,可以从 https://www.stunnel.org/downloads.html 下载Windows版本的stunnel,首次启动stunnel要回答一些问题来创建默认的stunnel.pem
现在将服务器生成的cert.pem复制到Windows stunnel配置文件目录。
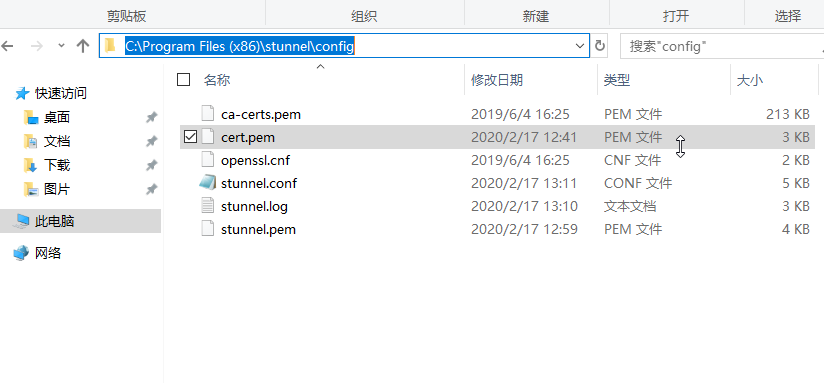
然后编辑配置文件stunnel.conf

1
2
3
4
5
6
7
8
9
10
11
debug = info
output = stunnel.log

[tinyproxy]
client = yes
accept = 6666
connect = 129.204.152.8:3128
;CAfile = cert.pem
cert = cert.pem
key = cert.pem
verify = 3

最后启动stunnel,成功。

stunnel官网在线帮助手册: https://www.stunnel.org/static/stunnel.html
以上便是代理服务器的配置~

参考

Tinyproxy Wiki
Using stunnel and TinyProxy to obfuscate HTTP traffic
Windows系统Stunnel使用简介


本博客所有文章除特别声明外,均采用 CC BY-SA 4.0 协议 ,转载请注明出处!